

Monday, March 22, 2010
Southern Flourish
Have you checked out this new online mag yet? I enjoyed a few of the features in here. I would say, sort of a more modern Southern Living, maybe? I do have to admit, it does make me miss the South. (that seems to be a recurring theme, doesn't it?)

Friday, March 19, 2010
Next Project...wedding invitations!
I am very flattered that Ryan and Jamie asked me to make their wedding invitations. Since they are having a small destination wedding, we thought we could make the invitations as more of a pretty little package. I have been brainstorming this week, so I will look forward to sharing my progress.
This is the inspiration photo that Jamie found for color...and away we go!!

This is the inspiration photo that Jamie found for color...and away we go!!

Much Better...
A few weeks ago, I added a towel rack to my Ikea cart. After my brother saw my post, he suggested a different towel rack from the Container Store. I liked his idea much better. I went and picked one up yesterday, and it is much better! I like the finish on this one too since it matches the stain! Thanks for the suggestion, Ry!


They're Baaaaack....
This made my week. The lemon tree that was saved from death is now flowering. I could sit and sniff these delicate blooms all day. Welcome back, lemon tree. I missed you.


Rene's Baby Shower
Back in Columbus, Meg hosted a baby shower for Rene. It was so much fun helping out. Meg is the queen of breakfast. She and her husband always talk about opening a B&B someday, and I can't wait to be one of their first guests. What is more cool than just talking about opening one...Meg and Akim travel a lot, and they always try to stay at B&Bs, with the purpose of checking them out, learning about them, etc. I love that. Meg is always up for trying new recipes, she is an expert meal planner, she has a great sense of style, and puts on a good bash.
Being that it was a small group of mostly local girls, I wanted to make a fun invitation that I may not have made if they had to be shipped. So, Meg and I put together these diaper invitations and then packaged them in lime green takeout containers.
I printed the invitation details onto iron on transfer paper, and then we pressed them onto cloth diapers. (This didn't go as smoothly as we had planned if I remember correctly...maybe we needed better transfer paper??). It took us a while to find the diaper pins, but we were finally able to locate yellow ones. Phew!

We then folded them up with the invitation facing up and placed them into takeout containers.

I whipped up some name tags, and we tied them on with cute animal ribbon that we found to match our containers.

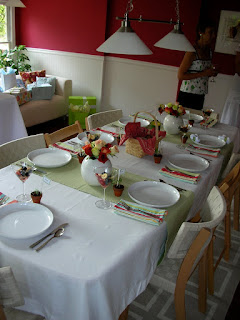
Meg set a beautiful table. I remember asking about where to get flowers, and she was able to pick up these assorted roses for a steal, and I really felt like they pulled together her lime theme along with the bright fruit she served (notice the fruit was served in the martini glasses...very cute!) and her beautiful dining room.
For favors, we found little herb pots at Target in the $1 section. Meg planted and tended to them before the shower, and I made name tags that I attached to lollipop sticks that we simply stuck in the pots.
For favors, we found little herb pots at Target in the $1 section. Meg planted and tended to them before the shower, and I made name tags that I attached to lollipop sticks that we simply stuck in the pots.

The sweet treats...I made some of Paula Deen's sour cream caramel cakes and ordered the cute Petit Fours (I wish I had the patience to attempt a dessert like that!)

Some yummy Petit Fours in honor of Bobby! From Columbus Corner Bakery

Meg was a wonderful hostess and the food was out of this world! What a lovely day.

Brenda, baker extraordinaire!
It was always such a treat to go over to eat at Randy and Brenda's house. They are both such excellent hosts. A delicious meal with nothing but the freshest ingredients, a divine cocktail, a sweet treat, and the best company was guaranteed. It was always fun to watch Randy and Brenda do their thing in the kitchen...they are both excellent cooks and are absolutely in their element while they whip up delightful concoctions.

Sidenote: This picture got me thinking of the infamous NYE Randy & Brenda hosted. What a riot. When Hallie and I reviewed the pictures the next morning, we discovered we had 1024 pictures to capture the later part of the evening. This was my Nikon D40's first big night out, and we all used it, and figured that the best strategy was to take rapid fire pictures the whole night. I have just been laughing out loud reviewing the antics of the evening. This is definitely one of those 'you had to be there' types of nights, but ladies...ahhhh, that was so memorable. As I think about it more, maybe the secret to Randy and Brenda's entertaining really is the pole in their kitchen...
I digress. So, back to Brenda the baker...
I have been thinking about Brenda's baked goodies lately - I made her 'to die for' carrot cake for McGov's birthday cake just this past weekend...and Sommer made them for Brady's bash. You can never go wrong with this coveted recipe. I am going to try to twist Brenda's arm to be a guest blogger and share some new cooking/baking adventures with us!
I had the privilege of having my 30th birthday cake baked by Brenda....her heavenly chocolate raspberry treat. My mouth is watering as I write this. And how cute is it with the fresh berries and those adorable candles?

Brenda also makes Pavlova, a dessert she grew up with in New Zealand. She has a way of making everything that she touches gorgeous.


This year I am asking for a flourless chocolate cake with ganache (okay, maybe I have been asking for this for a couple of years). Decadent? Um, yes. Illegal? Maybe. Against my Lenten resolutions? Definitely. (but, don't I get an exception for my birthday?)
I specifically have asked Sean to make it....I think it would be cute to see him baking. Plus, he is such a good cook, I have confidence that he could knock this one out of the park. I told him I thought it would be a sweet tradition if he and Paddy could bake me a cake each year. I will keep you posted on this one...Brenda, maybe you could give him some pointers?
the lovely and talented couple (you may remember, Randy has made many of our furniture pieces)

Sidenote: This picture got me thinking of the infamous NYE Randy & Brenda hosted. What a riot. When Hallie and I reviewed the pictures the next morning, we discovered we had 1024 pictures to capture the later part of the evening. This was my Nikon D40's first big night out, and we all used it, and figured that the best strategy was to take rapid fire pictures the whole night. I have just been laughing out loud reviewing the antics of the evening. This is definitely one of those 'you had to be there' types of nights, but ladies...ahhhh, that was so memorable. As I think about it more, maybe the secret to Randy and Brenda's entertaining really is the pole in their kitchen...
I digress. So, back to Brenda the baker...
I have been thinking about Brenda's baked goodies lately - I made her 'to die for' carrot cake for McGov's birthday cake just this past weekend...and Sommer made them for Brady's bash. You can never go wrong with this coveted recipe. I am going to try to twist Brenda's arm to be a guest blogger and share some new cooking/baking adventures with us!
I had the privilege of having my 30th birthday cake baked by Brenda....her heavenly chocolate raspberry treat. My mouth is watering as I write this. And how cute is it with the fresh berries and those adorable candles?

Brenda also makes Pavlova, a dessert she grew up with in New Zealand. She has a way of making everything that she touches gorgeous.


This year I am asking for a flourless chocolate cake with ganache (okay, maybe I have been asking for this for a couple of years). Decadent? Um, yes. Illegal? Maybe. Against my Lenten resolutions? Definitely. (but, don't I get an exception for my birthday?)
I specifically have asked Sean to make it....I think it would be cute to see him baking. Plus, he is such a good cook, I have confidence that he could knock this one out of the park. I told him I thought it would be a sweet tradition if he and Paddy could bake me a cake each year. I will keep you posted on this one...Brenda, maybe you could give him some pointers?
Wednesday, March 17, 2010

Tuesday, March 16, 2010
Can I get excited?
Is spring really beginning? I always jump the gun...on the first nice day, I just want to believe that all the cold weather is gone. Spring is just such a wonderful awakening, isn't it? I just wanted to ditch all the other things I needed to do today to instead go walking, go to a farmer's market, drink wine on our porch with Sean, plant herbs, have coffee outside, etc. And let me tell you, it wasn't even that warm. Even if we still have a few cold days, I can tell we have turned the corner...spring is on its way.
Today made me want to ride bikes...I'll take one of these, please.

Today made me want to ride bikes...I'll take one of these, please.

~taken in Charleston, May 2009.
Wednesday, March 10, 2010
Lampshade light fixture - DIY
After we broke one of the lamps in our bedroom, I wanted to figure out a way to use the lampshade as a light fixture for the small spot between our 'cruise ship' bathroom and our teeny closet. Our place is definitely not up to code from an electrical standpoint, so we have needed to rig up lots of lights around our place.

I wrapped the cord around the lampshade supports, but couldn't successfully keep the lightbulb in the middle of the lampshade...argh!

Now I am seeing these fixtures popping up in lots of catalogs! Fun. So, thanks to my brother's awesome tutorial, he helped me take my off-centered attempt at a cool new fixture to the real deal. Our disclaimer...neither of us are electricians, so do this at your own risk ;).
I talked to Ryan because I thought if I could figure out how to splice the wire to allow it to feed through the small opening on a lampshade, I could start keeping an eye out for cool lampshades to serve as light fixtures around our next house. Ryan had a Hemma cord laying around as well, so he put together the following tutorial.
What you need:
--Ikea Hemma Cord
--Lampshade
--light bulb
--Knife (I used a Gerber)
--Wire Cutters (not necessary, but made things a bit easier)
--Electrical tape
Step 1 - Cut cord. I decided to do it near the plug cause it is probably less visible there.

Step 2 - Slice the main sheath back to expose the white and black wires.


Step 3 - Now strip the insulation off the actual wires. You likely cut a few pieces of the wire as well (as you can see that I did), but as long as you don’t cut a bunch of them, it will be fine.


Step 4 - Twist the wires.

Step 5 - Twist the two whites together and twist the two blacks together.

Step 6 - Tape each wire separately so the copper can't touch.

Step 7 - Clip a little bit of the outer sheathing off as the cord will now be a little shorter.

Here is my pic...I don't have white electrical tape...


So, it doesn't look all that much different, but to me, it does. I am SO happy that the bulb is now properly set inside the shade! Thanks so much to Ryan for the perfect tutorial. I hope to be able to use this idea again!


I don't normally like purple...
but I am really digging this color combo of green, white and purple...hmmm...could this be a color combo for a room when we get to NY?


Subscribe to:
Posts (Atom)


