After we broke one of the lamps in our bedroom, I wanted to figure out a way to use the lampshade as a light fixture for the small spot between our 'cruise ship' bathroom and our teeny closet. Our place is definitely not up to code from an electrical standpoint, so we have needed to rig up lots of lights around our place.
I wrapped the cord around the lampshade supports, but couldn't successfully keep the lightbulb in the middle of the lampshade...argh!
Now I am seeing these fixtures popping up in lots of catalogs! Fun. So, thanks to my brother's awesome tutorial, he helped me take my off-centered attempt at a cool new fixture to the real deal. Our disclaimer...neither of us are electricians, so do this at your own risk ;).
I talked to Ryan because I thought if I could figure out how to splice the wire to allow it to feed through the small opening on a lampshade, I could start keeping an eye out for cool lampshades to serve as light fixtures around our next house. Ryan had a Hemma cord laying around as well, so he put together the following tutorial.
What you need:
--Ikea Hemma Cord
--Lampshade
--light bulb
--Knife (I used a Gerber)
--Wire Cutters (not necessary, but made things a bit easier)
--Electrical tape
Step 1 - Cut cord. I decided to do it near the plug cause it is probably less visible there.
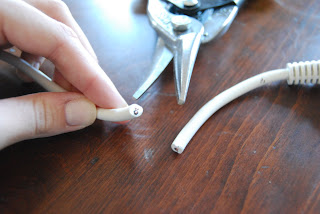
Step 2 - Slice the main sheath back to expose the white and black wires.
Step 3 - Now strip the insulation off the actual wires. You likely cut a few pieces of the wire as well (as you can see that I did), but as long as you don’t cut a bunch of them, it will be fine.


Step 4 - Twist the wires.
Step 5 - Twist the two whites together and twist the two blacks together.
Step 6 - Tape each wire separately so the copper can't touch.
Step 7 - Clip a little bit of the outer sheathing off as the cord will now be a little shorter.
Step 8 - Tape back together tightly. You could probably get some of those shrink wrap tubes in white and use those instead of tape if you want it to be a bit cleaner.
Here is my pic...I don't have white electrical tape...
And here is my brother's pic - you can tell he is much better at this than I am :)
So, it doesn't look all that much different, but to me, it does. I am SO happy that the bulb is now properly set inside the shade! Thanks so much to Ryan for the perfect tutorial. I hope to be able to use this idea again!


Nice tutorial! You should link this up to Strut your Stuff Thursday at Somewhat Simple!
ReplyDeleteYou just made my night! I've been searching around all night trying to figure out how to hang the shade from the cord kit, there are a lot of photos but none showing it from the inside. Thanks for the great tutorial and photos!
ReplyDeleteWow, you made it easier for me to figure that out. We need a light in our bedroom so my husband and I are thinking of how we can turn our old lampshade into a chandelier. We have some extra hand forged iron from our last renovation. I think we'll just use that for added support or something. Thanks for the tutorial!
ReplyDeleteNice tutorial. We have a nice mid-century floor lamp with a beautiful shade that just didn't fit in our little duplex anywhere. I used it to hang over our round mid-century dining table using your method! thanks!
ReplyDeleteI'm going to have to try this sometime. Thanks so much for the tutorial!! :)
ReplyDeleteBest,
Lauren
http://31diy.blogspot.com
PS - Your shade looks beautiful, especially with the drapes around it.